Friday, August 9, 2013

Rainbow sandals review...

Hello all. 

Many of you will remember my post about buying a pair of Rainbow sandals while on vacation in Myrtle Beach. 

Well, I thought it would be fun to post a little review about these amazing sandals now that I've had a month or so to break them in. 

First off, I waited over a year before I actually purchased a pair. Anyone who knows me, knows I have a weird internal calculator that keeps purchases in check. So paying $50 ish dollars for a pair of flip flops seemed unreasonable. But after a year of reading review after review about how incredible they were, I broke down and bought a pair. And honestly, I've never looked back!


Here are my sandals after about a month of wear. I also wore the sandals almost everyday during our trip to Gettysburg, Pa, where we did all sorts of walking through museums, and battlefields. Did I have blisters? Yes. Very small ones on my 2nd toe where the strap goes in. between your toes. But, the blisters weren't bad at all, and I continued to wear them everyday. Now, they have molded to my foot, and are super comfortable. Beyond anything I've ever worn before! They have superior arch support, which is something I've struggled with while wearing most sandals. 

I'm sold on these babies. I would recommend them to anyone looking for a quality sandal. They also look nice, and are made of very durable leather. They are definitely worth $50, seeing as they will last for multiple summers. :) (Or that's the common theme on the reviews.) I will update if I have any further comments or problems. But, I'm seriously not anticipating it! Haha. :)

Tuesday, July 9, 2013

Myrtle Beach 2013

My family made their annual trek to Myrtle Beach the last week in June. Thankfully, I was able to fly down for most of the week to spend some time with my family. Because Jake and I were going to Gettysburg the week after I returned, he was unable to go with me.

I flew out of Huntington, WV, and because Jake is terrified of the thought of flying I took tons of pictures to show him when I returned...


After I landed in Myrtle Beach, Mom and Gram Keller were there to greet me. Gram is the tiny dot wearing the green shirt. :D
As soon as I landed, my brother Josh and his wife Keshia, Mom and Brent, and I walked to one of our favorite restuarants at the beach - The Pier! It was a great way to kick off a relaxing week.  We also went putt-putt golfing, where everyone scored a hole in one, except for Brent who won the entire game. And Gram Keller actually had 2 hole in ones!

We also went on the Sky Wheel. Which is a huge farris wheel right on the boardwalk. You sit on benches in glass "bubbles", complete with air conditioning, and doors. I was impressed with how comfortable it was. And we were able to fit 6 people into our bubble.

 View from the top
Because Jake is scared of heights, I took this one for him. :P


During a little shopping spree, I finally decided to purchase a pair of Rainbow sandals. I read about Rainbows last summer and how comfortable, durable, and long lasting they are. So, I thought that it would be a good investment...
In retro-spec, I should have purchased them last year. They are really the best sandal I've ever owned. More than worth the initial investment.

All in all, it was a fabulous week with my family. I'm so thankful I was able to go, and make countless memories in one of our favorite places. In closing, I'll leave you with some pictures of the beach. Up next is Gettysburg!


Wednesday, May 22, 2013

Natural Strawberry Jam...

Making strawberry jam is a May tradition in my family. Last year, I made my first batches of freezer jam with much success. Unfortunately, my only problem was that I didn't make enough jam. My husband, and Father-n-law could knock out a pint or so of jam in one or two sittings, so I was determined to can enough jam this year to last us through most of the winter. :D

The Mennonite's in London started selling fresh strawberries over the weekend, so I was determined to buy as many as I could process on my day's off. I ended up with 3 gallons, which equates to 12 quarts. Plenty for jam, and fresh strawberry pie. I came to the conclusion that I wanted to try canning without pectin, after doing some research about preserving food the way it was done 100 years ago.

First start by wearing a very cute apron (for all the ladies out there...)


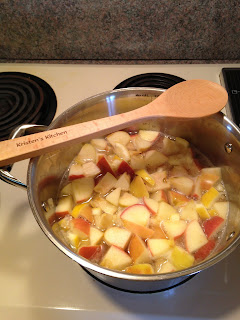
I started with 5 or 6 apples (I used fuji), and a lemon. Let me plug the importance of organic produce, because you leave the peels on both. First, you cut the apples into small pieces, leaving the everything but the stem, and the opposite side that has the little leaf.

Sorry about the orientation of the picture. I have it saved correctly, but blogger is being weird.

You also do the same thing to the lemon. Then you combine them in a pot, with enough water to keep them from sticking. (I filled it about half way.) Cook the apple/lemon mixture for about 20 minutes, or until soft.

Then strain off the excess water, and push through a sieve. I didn't have a sieve, so I used a fine wire strainer, and used a wooden spoon. The end product is a puree, and you need about 2 cups. I was leery that this would produce enough pectin, but it worked so well.

Add the 2 cups of puree to 8 cups of quartered strawberries, then add 4.5 cups of sugar. I used organic sugar, because it's what I've been buying lately. I'm not sure if regular white sugar would change the taste. Either way, I'm sure it's going to be great.

You can see the puree in the turquoise bowl, and the strawberry tops I cut off. Please ignore the puree slopped all over the counter.

Make sure you use a deep cooker to combine everything in, after you add it to the stove top, it will bubble up like a strawberry volcano if you don't watch it. I caught mine before it got to high, but man alive that would be a mess! The trick is to heat it up, and to get the right temperature (around 220 degrees. A candy thermometer comes in handy.) So, I had my stove-top on high heat, and I put the lid half on the top to retain some of the heat when I wasn't stirring. Oh, and another word to the wise, once it starts boiling, wear an oven mitt to protect your hand as you stir. I have a lovely burn on my hand from jam bubbling up.

Once everything starts to boil, set your timer for 20 minutes. After you get to 20 minutes, take a spoonful of it, and place it on a saucer in the freezer for 5 minutes. I know, it sounds strange, but after 5 minutes, if you run your finger through it and it "wrinkles" up, your jam is finished. But if it doesn't, it needs a few more minutes boiling. It's a neat little trick that really does work!

As the mixture thickened, the amount on my spoon also thickened!

After your jam is ready, pull your jars out of the dishwasher (that's what I use to sterilize them), and pour jam into jars, leaving about 1/4 inch head space. Quickly, I must mention the cool jars I bought today...
The middle jar is a vintage jar, and the smaller quart jars are new. Ball is celebrating 100 years of jar's with this limited edition blue collection. I was beyond thrilled with them. It's hard to resist the impulse to buy some every time I see them.

Anyway, after placing the seals and rings on the jars, place them in a hot water boiler for 10 minutes, then let cool down for about 5 minutes in the water, then remove and let sit on a towel on the counter until you hear that glorious "pop" sound. My jam was very thick. I think I might have boiled it a tad too long, but it still tastes very good! Here's an example of how it set up...


Happy canning! 

Love,
Kristen


Natural Strawberry Jam Recipe

5 or 6 organic apples
1 organic lemon
2 quarts of strawberries (or 8 cups quartered)
4.5 cups of sugar (more or less depending on your preference)
4 quart jars or 8 pint jars

Cut apples, and lemon into small pieces, and boil until all pieces are soft. Strain, then sieve to create a puree. Add 2 cups puree to the strawberries, and sugar. Boil mixture around 20 minutes, then add to warm jars. Wipe off, and place seals, and rings. Then add to a hot water canner with about 1 inch of water on top. Boil for 10 minutes, then let cool down before removing. Listen for "pop" sound, or check tops to see if they sealed. Enjoy yummy strawberry jam!